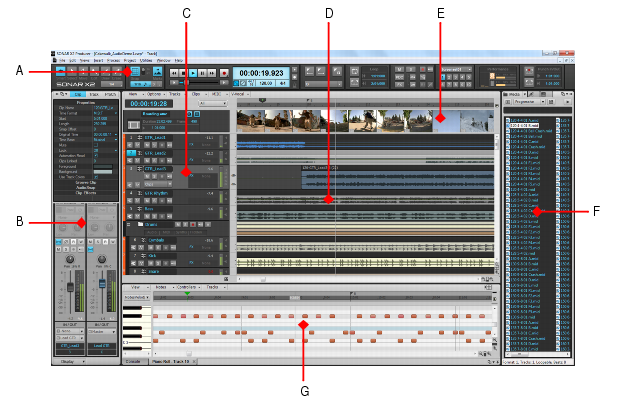
SONAR displays your project in windows on the screen that are known as views. You can have many views open at once, all showing the same project. When you edit a project in one view, the other related views are updated automatically.
Track view is the main window that you use to create, display, and work with a project. When you open a project file, SONAR displays the Track view for the project. When you close the Track view for a project, SONAR closes the file.
The Track view is divided into several sections: menu bar (at the top), the Navigator pane, the
Video Thumbnails pane, the
Track pane
, the
Inspector pane
, the
Clips pane
, the
Bus pane, the
Browser pane, and the MultiDock.
A. Control Bar
B. Inspector pane
C. Track pane
D. Clips pane
E. Video Thumbnail pane
F. Browser
G. MultiDock
All of the current track’s controls are contained in the Track Inspector, which is an expanded version of the current track’s controls located on the far left side of the Track view. You can hide or show the Track Inspector by pressing I on your keyboard (see
Inspectors, for more information).
The Track pane lets you see and change the initial settings for each track. To change the current track, move the highlight using the mouse or the keyboard as follows.
The Clips pane shows the clips in your project on a horizontal timeline called the
time ruler that helps you visualize how your project is organized. Clips contain markings that indicate their contents. The
Clips pane lets you select, move, cut and copy clips from place to place to change the arrangement of music and sound in your project.
The Bus pane shows the buses in the project, and also shows any editing views that are in tabbed (docked) format. The
Show/Hide Bus pane button

allows you to show or hide the Bus pane at the bottom of the Track view.
The Navigator pane displays a large part of your project so you can see an overview of your song. The
Navigator pane displays all of your project’s tracks.
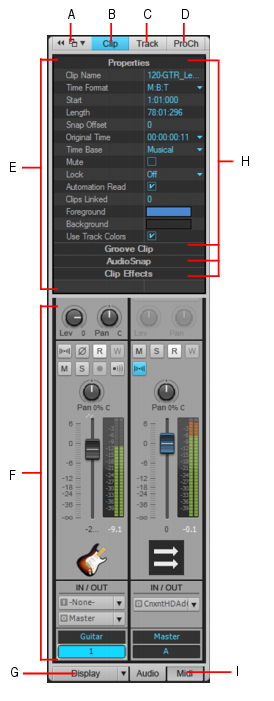
When working on a project, you will frequently need to access track and clip parameters and mix controls. The Track Inspector and Properties Inspector provide easy access to relevant settings for the selected track(s) or clip(s).
A. Dock/undock Inspector
B. Show/hide Clip Properties Inspector
C. Show/hide Track Properties Inspector
D. Show/hide ProChannel
E. Display area for Properties Inspector
F. Display area for Track Inspectors
G. Show/hide/configure Track Inspector modules
H. Section header bars (click to show controls)
I. Show audio output or MIDI settings (Instrument tracks only)
|
|
Track Inspector. The Track Inspector shows mix settings for the current track, bus, or main, and is essentially identical to a channel strip in the Console view. Advanced MIDI settings are also available for MIDI tracks and Instrument tracks. For details, see Track Inspector overview.
|
|
|
Track. The Track Properties Inspector lets you type a track name, specify an audio track’s AudioSnap render modes, specify the default clip colors, and enter a text description. For details, see Properties Inspector - Track Properties.
|
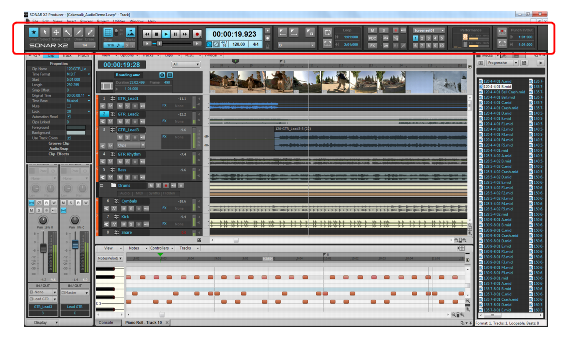
Much of your time in SONAR is spent recording and listening to your project as it develops. The Control Bar contains the most important tools and other pieces of information you will need to record, edit and play back your project.
The Control Bar consists of several modules that each contain various related controls. You can re-arrange and show/hide each individual module, which allows you to only show the functions you need most often. By default, the Control Bar is docked at the top of SONAR’s screen, but can also be undocked or docked at the bottom.
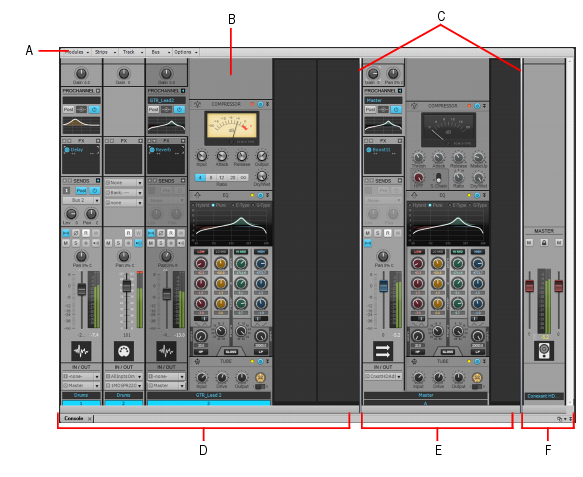
The Console view is where you can mix the sounds on all the different tracks to create the final mix of your project. While the Track view provides most of the same controls, you may want to use the more familiar interface of the Console view for mixing.You use the Console view to adjust the levels of sound for the different tracks in your project, to change the stereo panning, and to apply real-time effects to an individual track, combinations of tracks, or the final mix.
The Console view contains several modules of controls. There is one channel strip for each track and bus in your project. You can use bus sends to direct certain tracks to special modules that are known as
buses.
A. Console view menu
B. ProChannel (Producer only)
C. Pane splitter bars
D. Track channel strips
E. Bus channel strips
F. Main channel strips
As in the Track view, you can change track settings or record new music or sound in the Console view. You may choose to use one view or the other, or the choice you make may depend on which project you are working on.
SONAR has a number of other views you can use to display and work on your project. To display these view, choose the desired view from the
Views menu, or press the view’s keyboard shortcut.
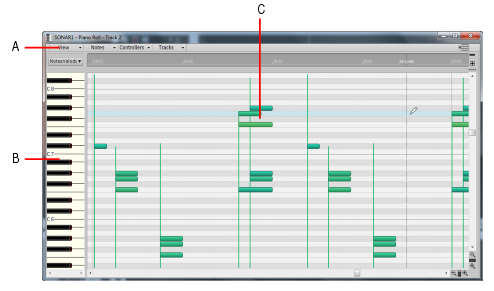
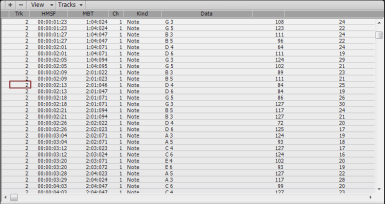
The Piano Roll view shows the notes from a MIDI track or tracks as they would appear on a player-piano roll. You can move the notes around, make them longer or shorter, and change their pitches by just dragging them with the mouse. You can also use the Piano Roll view to display and edit MIDI velocity, controllers, and other types of information. The Piano Roll view also contains the Drum Editor, which allows you to play different drum modules from a single track. For more information, see
Piano Roll view.
A. Piano Roll view menu
B. Key/Pitch pane
C. Note pane
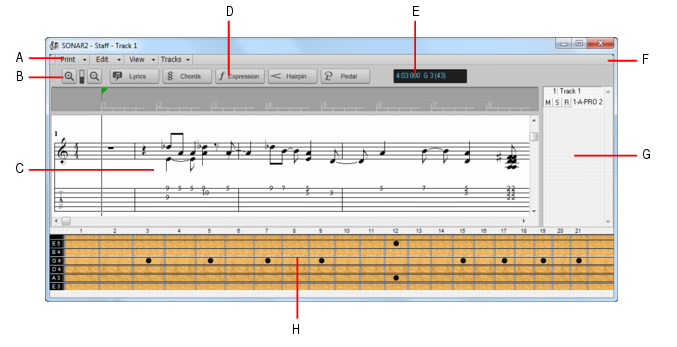
The Staff view displays the notes from one or more MIDI tracks using standard music notation, similar to the way the notation would appear on a printed page. You can add, edit, or delete notes; create percussion parts; add guitar chords and other notation markings; display guitar tablature; display the Fretboard pane; and print whole scores or individual parts to share with other musicians.
A. Staff view menu
B. Zoom in/out
C. Staff pane
D. Editing tools
E. Time and pitch locator
F. Dock/undock and expand/collapse
G. Track list pane
H. Fretboard pane
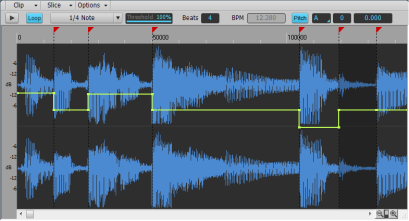
The Loop Construction view allows you to create and edit Groove clips (SONAR loops that “know” the tempo and key in which they were recorded), and export these clips as ACIDized files. For more information, see
Loop Construction view.
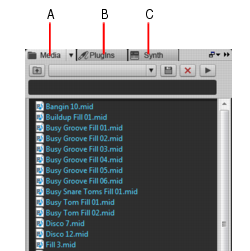
The Browser lets you find and import various types of content into your projects, including audio and MIDI files, track and project templates, track icons, FX Chain presets, effect plug-ins and instruments. You can drag content and plug-ins directly into tracks.
A. Media Browser
B. Plug-in Browser
C. Synth Rack Browser
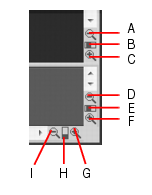
A. Zoom Clips pane out vertically
B. Vertical Zoom fader for Clips pane
C. Zoom Clips pane in vertically
D. Zoom Bus pane out vertically
E. Vertical Zoom fader for Bus pane
F. Zoom Bus pane in vertically
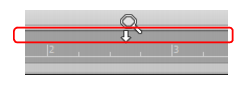
G. Zoom in horizontally
H. Horizontal zoom fader
I. Zoom out horizontally
When Auto Zoom is enabled, the current track will automatically zoom and any lanes will be shown at their minimum height, and all other tracks will be minimized. When a new track is focused, it swaps heights with the previously focused track.
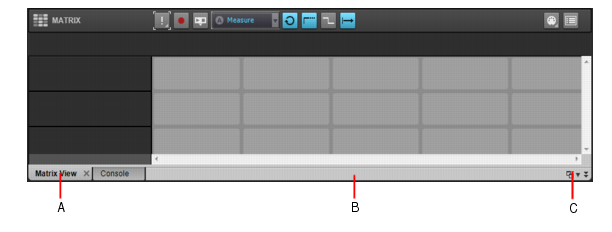
You can dock any view other than the Console view in the MultiDock by enabling a view’s Dock in MultiDock option. You can have as many views open in tabbed format as you want. You can toggle through the different views by clicking the tab of the view you want to see (or use the CTRL+SHIFT+LEFT/RIGHT ARROW shortcut). You can also maximize the pane to do detailed work in a view, or drag the splitter bar at the top of the view to enlarge the tabbed view area.
A. Each docked window has its own tab
B. Click to the right of the tabs and drag the MultiDock away from the bottom of the screen in order to undock the MultiDock
C. Dock/undock and expand/collapse the MultiDock
By default SONAR allows only one instance of each view, but you can lock the contents of most views, preserving the current view by forcing a new instance of the view to appear if necessary. Locking views is the only way you can have multiple instances of the same view open. Only the Track and Console views cannot be locked.
To lock a view, do one of the following:
When a view is float enabled, you can move it outside of the confines of SONAR. This is particularly useful if you take advantage of SONAR’s dual monitor support. Using dual monitor support, you can keep the Track or Console view on one monitor and “float” other views to the other monitor by dragging them to the second screen.
The X-Ray Windows feature eliminates the need to constantly minimize, move, or close windows in order to work in other windows. It works by decreasing the opacity of the current window enough so that you can see and work with the window that’s behind the current window. You activate the feature by pressing a keyboard shortcut (default shortcut is SHIFT+X) when the mouse cursor is over a window you want to x-ray. You can choose to X-Ray whichever window is underneath the mouse cursor, or automatically X-Ray all FX/synth property pages in one step (
Note: the mouse cursor does not need to be over any plug-in property pages).
|
1.
|
Use the Edit > Preferences command to open the Preferences dialog box, then select Keyboard Shortcuts.
|
|
4.
|
In the Key window, highlight the key or key combination that you want to use for the X-Ray command, then highlight X-Ray in the function column of the list of commands, then click the Bind button to bind them together.
|
|
6.
|
Click OK to close the dialog box.
|
|
1.
|
Use the Edit > Preferences command to open the Preferences dialog box, click Customization - Display and make sure the Enable X-Ray check box is selected.
|
|
1.
|
Use the Edit > Preferences command to open the Preferences dialog box, then click Customization - Display.
|
|
|
Enable X-Ray. Enable or disable this check box to turn the X-Ray Windows feature on or off.
|
|
|
Opacity. Adjust this value by typing in a value, or by clicking and holding the + or - button to adjust the final opacity percentage value that an X-Rayed window reaches.
|
|
|
Fade Out Time. Adjust this value by typing in a value, or by clicking and holding the + or - button to adjust the amount of time that an X-Rayed window takes to reach its final opacity percentage value.
|
|
|
Fade In Time. Adjust this value by clicking and holding the + or - button to adjust the amount of time that an X-Rayed window takes to restore its original opacity.
|
|
3.
|
Click OK to close the dialog box and accept your changes.
|
|
2.
|
In the Plug-in Categories window, select the category that the plug-in you want to exclude is in.
|
|
3.
|
In the Registered Plug-ins window, select the plug-in that you want to exclude.
|
|
7.
|
Open the Xrayexclude.ini file that’s in your SONAR program folder (use Notepad).
|
You may spend a lot of time making sure that all the views are laid out on the screen just the way you want. When you save your work, SONAR automatically saves the screen layout along with it. You can create up to 10 screensets per project and freely switch between screensets at any time.


.
is enabled, X-Ray keyboard commands won’t work.